Sale on canvas prints! Use code ABCXYZ at checkout for a special discount!

My name is Veronica Huacuja, a plastic artist, and an online art teacher. I’ve some practical tips for your painting process. Hope you find them useful.
PREVIOUS COMMENT. Sometimes, as figurative artists, the agenda of a physical model doesn’t match with ours. Nor a friend or relative has the time to pose for us. So, it’s time to use other resources we may have at our disposal.
A SOLUTION. I discovered Blender–a free and open-source 3D computer graphic software–on the Internet. I learned its basics in many free tutorials hosted in YouTube and began sculpting my 3D models. It’s amazing. You can manage everything, all the variables: the physical features of the model, the poses, views, lights, colours. After accomplishing the model, you take what you consider the best snapshots. Then, in the physical world, you sketch and paint your artwork with traditional techniques (using the snapshots displayed on Photoshop or some other graphic software)!
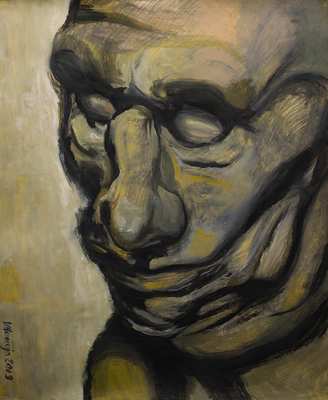
I add the following artwork in which I used these procedures. This its data sheet:
Title: Head Study 75
Artist: Veronica Huacuja
Medium: Oil and crayon on paper
Size: 108 x 91 x 0.1 cm
Year: 2019
Collection: Portraits
TECHNICAL COMMENTS. Some technical choices helped me to provide a powerful presence to the character:
- The medium format. Almost using 1 m2.
- The closeness of the character’s face displayed in a close-up. This treatment looks forward to provoke an emotional response in the observer.
- The strong black strokes I used to depict the features of the personage.
- The yellowish palette creating an atmosphere, which provides a sense of depth by representing three-dimensional spaces on the flat surface.
MATERIAL.
DIGITAL MATERIAL.
- Blender (any late version of this free software you find on the Internet).
- Digital tablet (I use and recommend one with hand pressure sensitivity. I use a Wacom tablet.)
- Photoshop (any late version of the software).
TRADITIONAL TECHNIQUE MATERIAL.
- Painting paper. A large Bond paper will do the job quite fine. This brand of paper is lightweight: 13 or 20 pounds.
- Brushes. Thick brushes of 1.5 inch.
- Thick black wax crayon. I use the Crayola crayons brand. With this black crayon, you can make forceful sketches.
- Oil paints. I use and recommend the brand Winsor & Newton. It’s an expensive one, but you won’t have problems with the color sinking process some other cheap brands have.
- Turpentine. Use this material to dissolve the oil paint on the paper and the strokes made by the crayon. It won’t deform the paper. Use a mask to prevent inhaling turpentine fumes.
ONE LAST RECOMMENDATION: After I paint a piece, I always turn it around to see its different views. Sometimes, I even use a mirror to see its reflection. This helps me to decide which view is the best for the work.
LET’S MAKE A MEANINGFUL REFLECTION FROM THE ABOVE. By including new processes in our art techniques we’ll discover new resources that’ll make our artwork unique. This besides having fun while doing so.
Please write your opinions in the comment section. It will generate a very interesting dialogue.
Last, if you find this work interesting and helpful, please FOLLOW my FAA feed (https://veronica-huacuja.pixels.com). Thank you!
Visit any time:
My ART SHOP: https://veronica-huacuja.pixels.com
MY PATRON FEED to see some photos of the process: https://www.patreon.com/posts/38517959
My BODY OF ART: https://veronica.mx
My ONLINE PAINTING COURSE in traditional or digital techniques: https://veronica.mx/online_painting_course
Thank you for reading.